 |
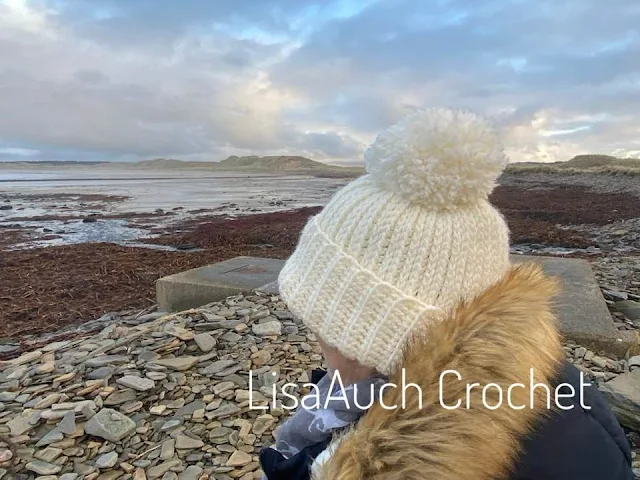
| Looks Like Knit Crocheted HAT with Pom Pom being worn |
Here in the NORTH of Scotland winds are strong and it's chilly.
You can BUY A PDF of This Crochet Hat Pattern
From Ravelry with Secure Paypal payment feature
Thank you for your continued Support
CLICK HERE
 |
| Easy Crochet Beanie Hat Pattern FREE |
 |
| Using th eFREE HAT Pattern it is easy to make an Adult man crochet Hat |
I am always receiving requests looking for a good thick cosy warm hat. One that can be crocheted for a man or a woman simple and stylish.
 |
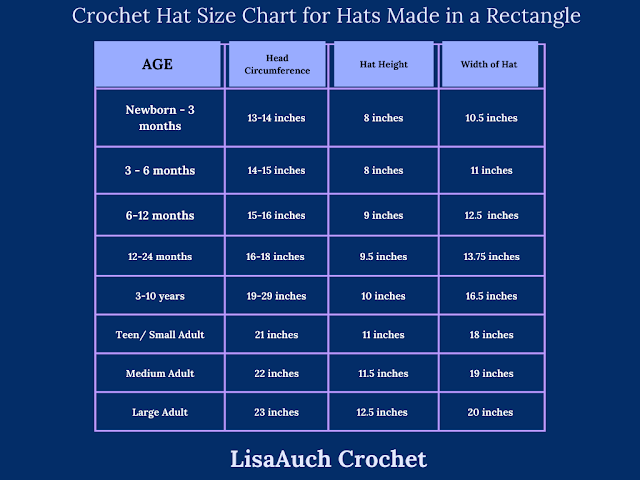
| This is the Hat my husband is wearing. YOu can make this hat fit all sizes by adding the TURNUP you wish measurement ADDED to the Main hat height measurement )see the table of sizes underneath |
 |
| Both hats were made using Chunky Aran |
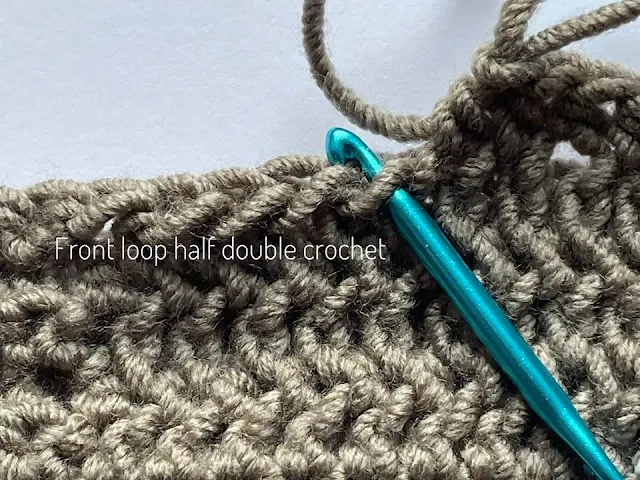
After working a normal HDC row, turn your work and You will see the Diagonal Bar.
This is where we will be working when creating the front HDC stitch.
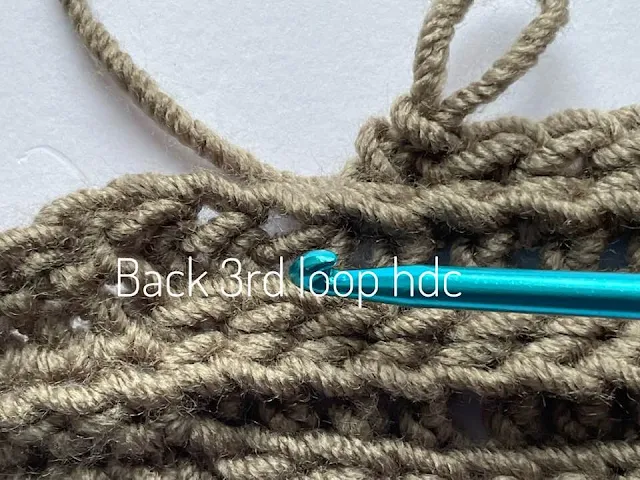
When working the BACK Half double crochet, we want to insert our hook and pull this diagonal 3rd bar to the BACK of the work to complete our HDC.
(On this row You are pushing the front and back loop V to the front of our work)
Working in this manner makes a beautiful KNIT 2, purl 1 effect, and makes this hat look like it's been knitted. But It's definitely a crocheted hat.
For more explanations of how we will work these stitches also. Please watch the Short videos below.
Lisa's Warm Cosy (Not Knit) Crochet Hat Pattern
Skill Level:- You must be able to work in back loops, and the Camel Stitch (working into 3rd hidden stitch of HDC)
- On 1 row you will work into the FRONT diagonal loop facing you on the 2nd row, you will work into the
- BACK/behind of the diagonal loop.
- Watch these 2 videos for a further explanation of working in the 3rd loop For the purpose of this pattern, I will call this the Front HDC 3rd loop = Fhdc3rd loop

This is how to work the opposite row for the hat Back HDC 3rd loop - Bhdc 3rd loop

You can Make all Sizes of the hat if you have head measurements.
To make this HAT ANY size You will need the Length of hat + Turnup length Chain that amount and complete several rows.
You can manipulate the numbers of each stitch worked to have more of the knit look in the middle of the hat and remember to slip stitch at the top for 5 sts , no matter what size.
Continue in ROWS until your LENGTH measures the circumference desired for the hat. Sew to join.
What you will Need to Crochet this HAT
- The pattern is written in US terms
- Yarn King Cole Chunky(af)
- Hook 5.50mm
- Special Stitches: Camel stitch worked in ROWS (For the purposes of THIS pattern.)
- Working in ROWS
- blsl st- back loop slip stitch
- blsc - Back loop single crochet
- SC - Single crochet
- HDC - half double crochet
- slst- slip stitch
- Front HDC 3rd loop - Fhdc3rd loop
- Back HDC 3rd loop - Bhdc 3rd loop
- Hat Height from top of crown to bottom of the ear – this will be your foundation chain.
- How many Stitches You HAVE in TOTAL will depend on how long you wish your hat.
- If you want a Big Turn up like mine then remember to include THAT measurement when you measure from the top of the crown to under the ear and then fold UP measuring tape until you have the BRIM size you want. If making for your self I simply measure the chain by making it long enough to go from the top of my head to under the middle of Chin.
- Measure head around just above the ears. Circumference of the head.
- This will be how LONG you work your rows Back and Forward until the circumference measurement is reached.
- Then I will ensure the number of chains I added for the TURN UP ARE made in THE Back Loops single Crochet,
- The Main length of hat will be made using HDC front or back post diagonal st. - Including Top 5 stitches made in back loop slip stitch
Crochet Hat Pattern, crochet hat is made in ROWS to form a rectangle then side seams sewn together and top is sewn around and pulled tightly to close.
Please NOTE: the purpose of this Crochet Hat I have based my stitches and stitch count to fit on a hat for an adult female and adult male.Row 1:
working into the 2nd chain from the hook, work single crochet into the first 20 sts, (for a DEEP turnup), 15 sts for a normal turn-up) HDC in the next 15 stitches, or 20 sts for normal turn up! (MIDDLE OF HAT), Sl st in last 5 sts (Top of hat) Ch1 TURN
Row 2:
Back loop slip st in first 5 sts, (working into the 3rd hidden loop FACING YOU) Front hdc 3rd loop in next 15 sts (20sts) , Back Loop Sc in nxt 20 (15) sts, Ch1 TURN
Row3:
BLSc in first 20 (15sts) sts, Back hdc 3rd loop in next 15 (20) sts, Back loop slip stitch in last 5 sts (40sts), Ch1 TURN
Continue working Rows 2 and 3 until you reach the desired length = Circumference of the head.
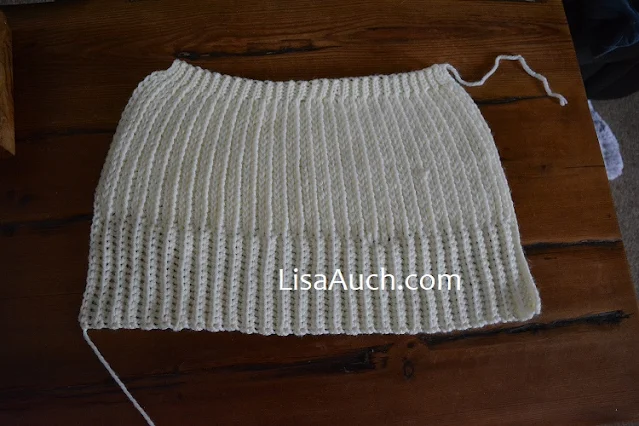 |
| How to turn your rectangle into a hat |
- Fold your Rectangle in Half and Sew up the seams together.
- Thread your needle and close the top of the hat at the last Slip stitches and pull tight to close.
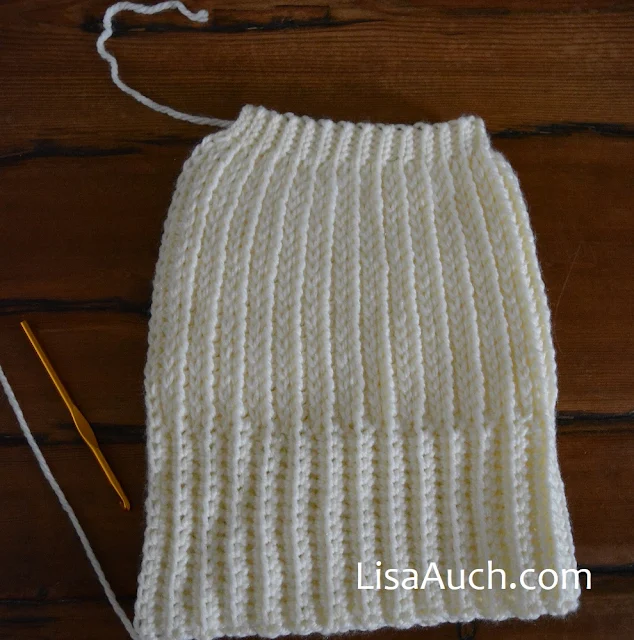 |
Whatever type of Pom Pom you decide on sew securely to the top of your hat.
 |
| The finished hat length will equal HAT HEIGHT and Hat Circumference of the size desired PLUS additional starting chain sts for the TURN-UP |
Crochet Hat Pattern FREE for Women
.jpg)
FREE Easy Crochet Hat Pattern
You MUST acknowledge LisaAuch.com as the original designer. YOU will NOT copy or distribute the pattern online TEXT OR PDF, in part or whole anywhere else, or by creating an online video of my pattern. Without my express written permission. You can share a picture of the finished item. With a link BACK to a Page with my website on it You must NOT use my pictures in any way to sell a finished product. You must use your own. You will NOT copy or duplicate this PATTERN (whole or in part) onto ANY other SITE online. Without my express written permission.
You will not crop or heavily EDIT the images belonging to LisaAuch Crochet/ Lisaauch.com, nor add any further TEXT or Imaging to the Original photos, without my permission. This pattern may contain affiliate links. I may make a small commission from your purchase at no extra cost to you . Happy Hooking (c) All Rights Reserved LisaAuch.com


.webp)
