FREE Crochet Shark Pattern | Fergal Sharkey

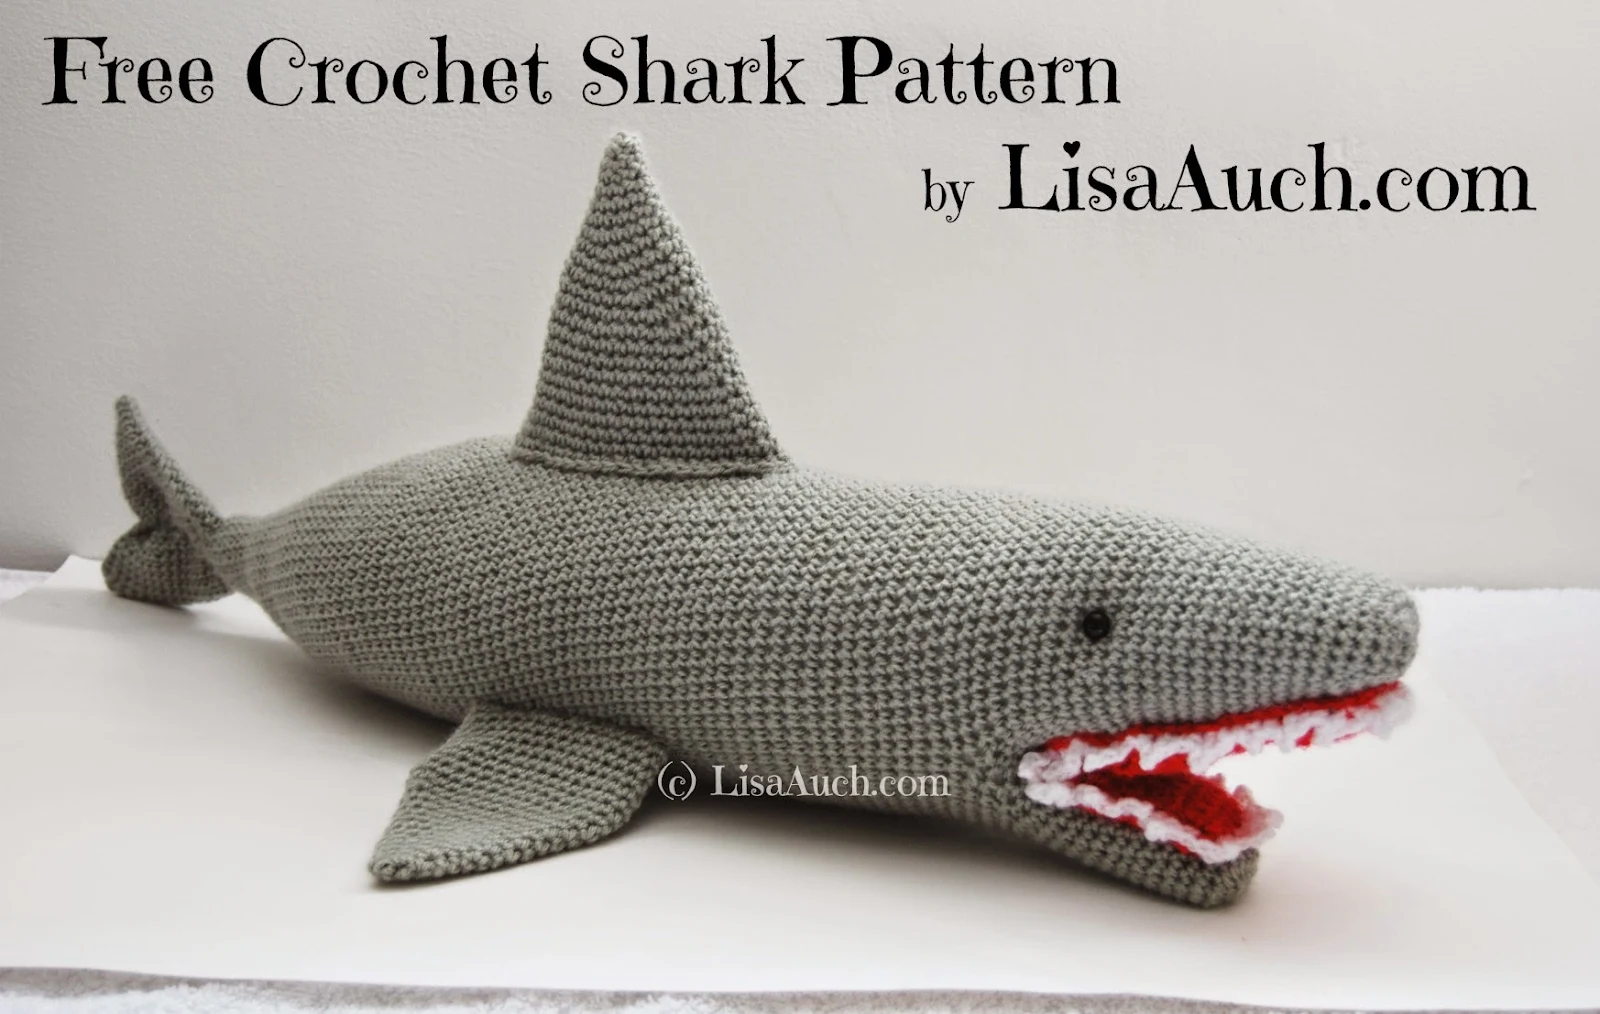
This is a large crochet shark!!! Free Crochet Shark Pattern by Lisa Auch.'Fergal Sharkey' 


free crochet shark pattern, crochet , shark , pattern
A free pattern to crochet your very own Large soft toy shark


I am not kidding when I say this is a big shark, if you wish to crochet a small shark, I have a 3-in-1 crochet shark pattern, where you can make it into a SHARK,  ORCA, or a WHALE Plush  small or make it with thinner yarn and add a keyring 
(these sell fast at local craft fairs, I make a few of these throughout summer because they are quick and easy to crochet! so make a nice summer crochet project to make in the heat!) 
 
3 in 1, Orca, Shark and Whale EASY FREE crochet patterns

After visiting the local Sealife Centre with my Niece and Nephew, who fell in love with the sea life creatures, fishes, and all the sharks we got to see. My adorable niece who is 5 and is in love with every animal, land or sea, you can possibly think of,  challenged me to crochet her a .....SHARK, well who can resist her gorgeous pleading eyes? 
 
SO I set to work to crochet a LARGE Shark. Pin this page on Pinterest for safe keeping! 


This pattern is as I made it, and when I shared the finished Sharks picture people asked for the pattern, it has not been tested, you should have a basic understanding of crocheting amigurumi style and reading such patterns.
If you come across a glaring error in the pattern or numbers please do not hesitate to contact me so I can correct it.
Your helpfulness helps others too.

To crochet the Large Shark You Will Need a 3.5mm hook.

200grms of grey DK yarn, I used Red Heart Bella 

Some red and white yarn for the mouth and teeth.
 
Black Yarn for eyes (or you can use safety eyes if you prefer.)
 
I also used a small piece of cardboard for the Top Fin to help hold its shape, However, this means if you use cardboard it cannot be washed, instead clean with a damp cloth


Special Notes:
This Pattern is written in US terms
 
Use a stitch marker at the start of each and move upon completion of each round.
 
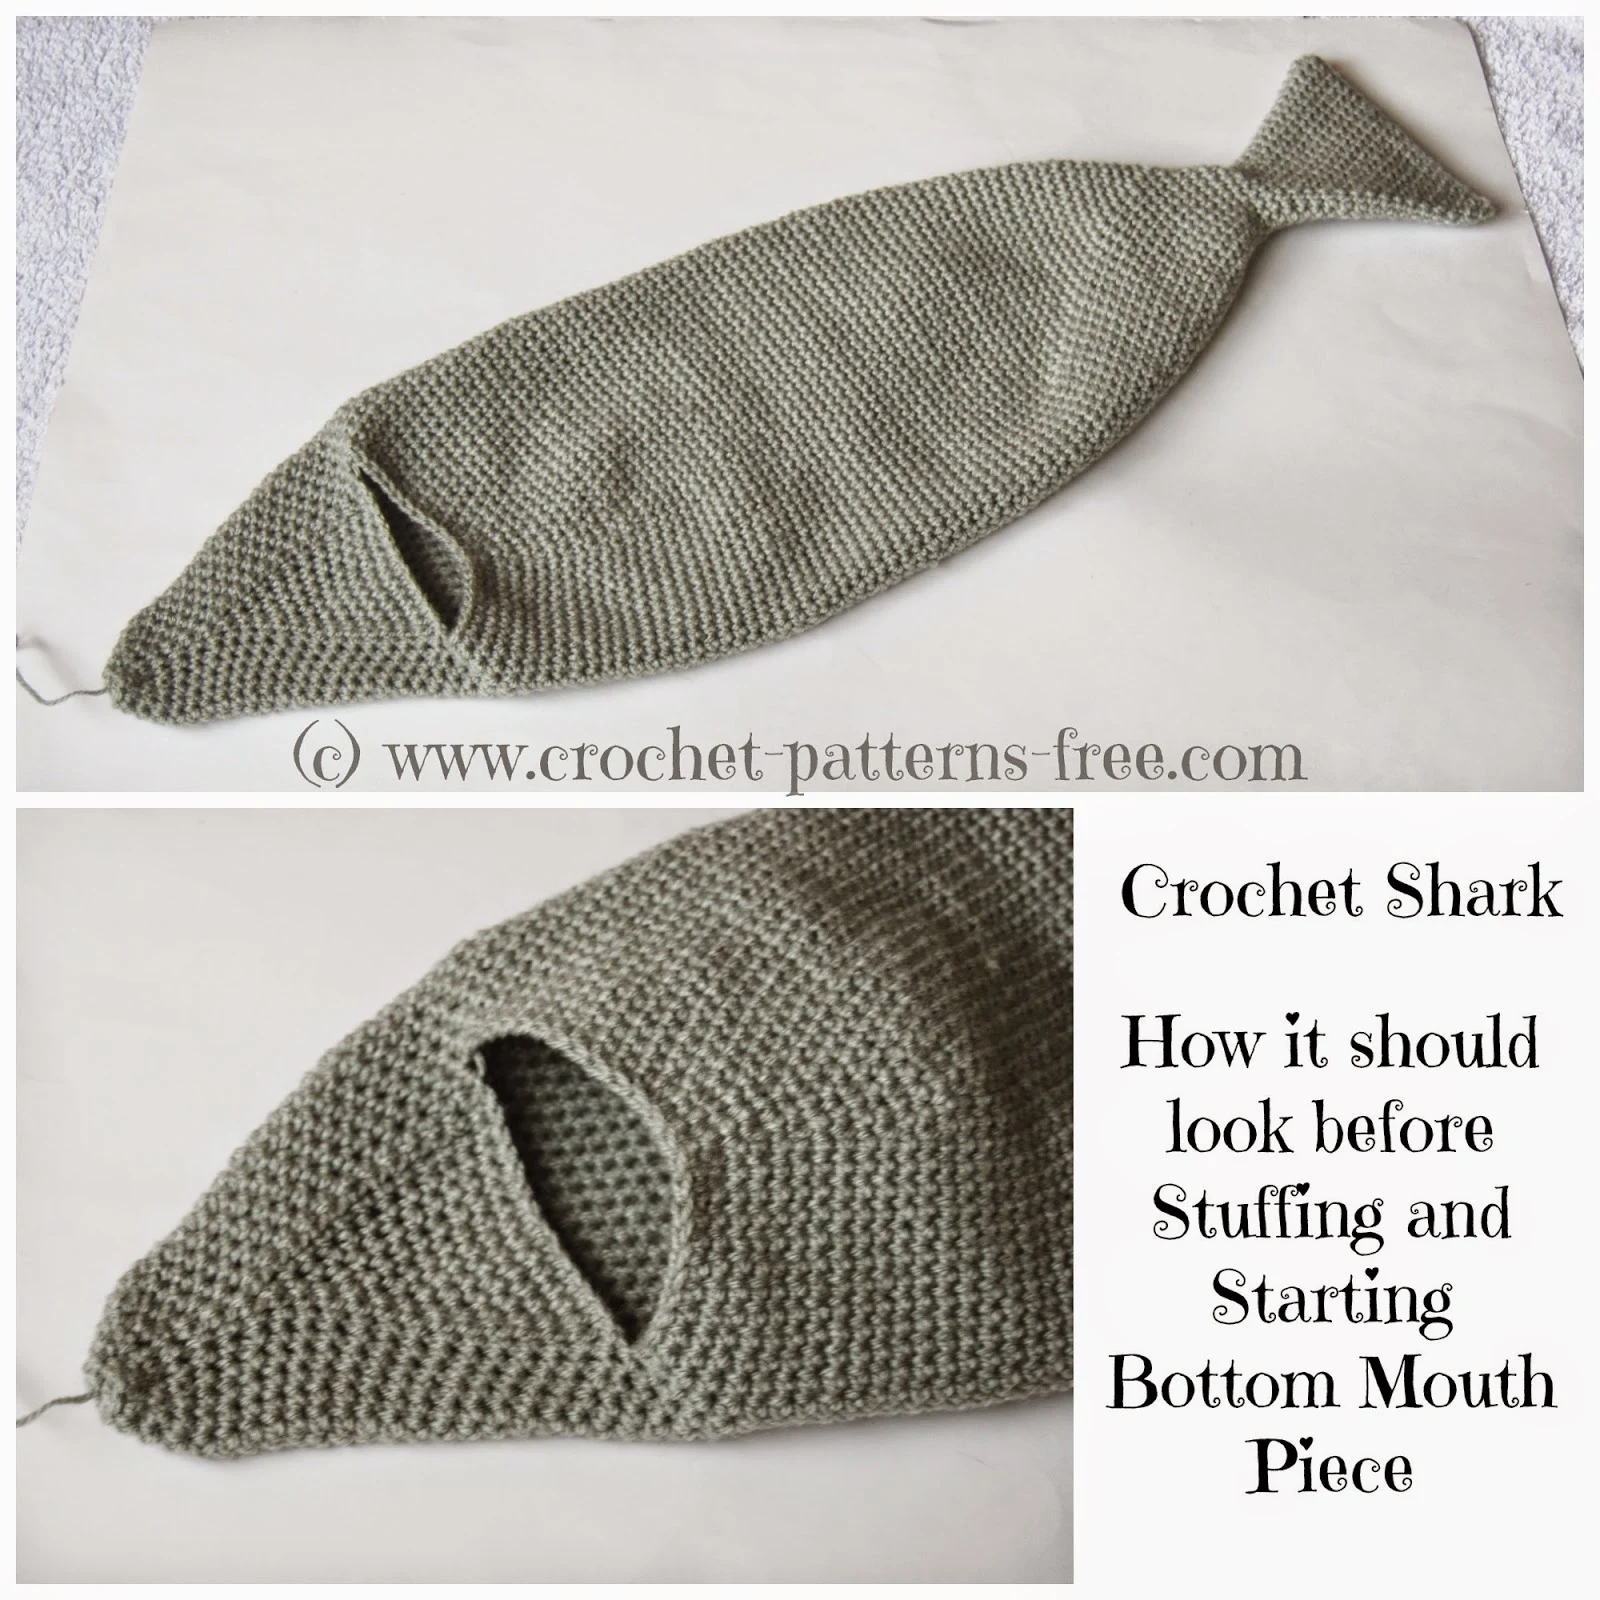
The pattern for the shark is worked from the tail to the mouth, where we will split the piece and then work separately in rounds to make the opening for the mouth.
 
finished and Stuffed the Shark is 25 inches long.

Sharks Tail - Body - Head Pattern

 ch 23,  sc in 2nd stitch from hook, sc in each chain to last st ,work 2sc in last st.
working in the back of chain just worked, sc to last st, 2sc in last st place marker and move up on completion of each rnd (44)
Rnd 2:  sc around
Rnd 3:  sc2tog, sc in next 20sts,sc2tog, SC to end of Rnd   (42)
Rnd 4:  sc2tog, sc in next 19sts,sc2tog, SC to end of Rnd   (40)
Rnd 5:  sc2tog, sc in next 18sts,sc2tog, SC to end of Rnd   (38)
Rnd 6:  sc2tog, sc in next 17sts,sc2tog, SC to end of Rnd   (36)
Rnd 7:  sc2tog, sc in next 16sts,sc2tog, SC to end of Rnd   (34)
Rnd 8:  sc2tog, sc in next 15sts,sc2tog, SC to end of Rnd   (32)
Rnd 9:  sc2tog, sc in next 14sts,sc2tog, SC to end of Rnd   (30)
Rnd 10: sc2tog, sc in next 13sts,sc2tog, SC to end of Rnd   (28)
Rnd 11: sc2tog, sc in next 12sts,sc2tog, SC to end of Rnd   (26)
Rnd 12: sc2tog, sc in next 11sts,sc2tog, SC to end of Rnd   (24)
Rnd 13: sc2tog, sc in next 10sts,sc2tog, SC to end of Rnd   (22)
Rnd 14: sc2tog, sc in next  9sts, sc2tog, SC to end of Rnd   (20)
Rnd 15: sc2tog, sc in next  8sts, sc2tog, SC to end of Rnd   (18)
Rnd 16: sc2tog, sc in next  7sts, sc2tog, SC to end of Rnd   (16)

This is the end of the tail and we will be beginning the body of the Shark

Rnd 17 : sc around (16)
Rnd 18 : sc around (16)
Rnd 19:  2sc in next st, sc in next 7sts, 2sc in next st, sc to end (18)
Rnd 20:  2sc in next st, sc in next 8sts, 2sc in next st, sc to end (20)
Rnd 21:  2sc in next st, sc in next 9sts, 2sc in next st, sc to end (22)
Rnd 22:  2sc in next st, sc in next 10sts, 2sc in next st, sc to end (24)
Rnd 23:  2sc in next st, sc in next 11sts, 2sc in next st, sc to end (26)
Rnd 24:  2sc in next st, sc in next 12sts, 2sc in next st, sc to end (28)
Rnd 25:  2sc in next st, sc in next 13sts, 2sc in next st, sc to end (30)
Rnd 26:  2sc in next st, sc in next 14sts, 2sc in next st, sc to end (32)
Rnd 27:  2sc in next st, sc in next 15sts, 2sc in next st, sc to end (34)
Rnd 28:  2sc in next st, sc in next 16sts, 2sc in next st, sc to end (36)
Rnd 29:  2sc in next st, sc in next 17sts, 2sc in next st, sc to end (38) 
Rnd 30:  2sc in next st, sc in next 18sts, 2sc in next st, sc to end (40)
Rnd 31:  2sc in next st, sc in next 19sts, 2sc in next st, sc to end (42)
Rnd 32:  2sc in next st, sc in next 20sts, 2sc in next st, sc to end (44)
Rnd 33:  2sc in next st, sc in next 21sts, 2sc in next st, sc to end (46)
Rnd 34: 2sc in next st, sc in next 22sts, 2sc in next st, sc to end  (48)
Rnd 35:  2sc in next st, sc in next 23sts, 2sc in next st, sc to end (50)
Rnd 36:  2sc in next st, sc in next 24sts, 2sc in next st, sc to end (52)
Rnd 37:  2sc in next st, sc in next 25sts, 2sc in next st, sc to end (54)
Rnd 38:  2sc in next st, sc in next 26sts, 2sc in next st, sc to end (56)
Rnd 39:  2sc in next st, sc in next 27sts, 2sc in next st, sc to end (58)
Rnd 40:  2sc in next st, sc in next 28sts, 2sc in next st, sc to end (60)
Rnd 41:  2sc in next st, sc in next 29sts, 2sc in next st, sc to end (62)
Rnd 42:  2sc in next st, sc in next 30sts, 2sc in next st, sc to end (64)
Rnd 43:  2sc in next st, sc in next 31sts, 2sc in next st, sc to end (66)
Rnd 44:  2sc in next st, sc in next 32sts, 2sc in next st, sc to end (68)
Rnd 45-  Rnd 80: sc around (68)
Rnd 81: sc in next 40 sts, 2sctog, sc to end (67)
Rnd 82: sc in next 42 sts, 2sctog, sc to end (66)
Rnd 83: sc in next 38 sts, 2sctog, sc to end (65)
Rnd 84: sc in next 40 sts, 2sctog, sc to end (64)
Rnd 85: sc in next 42 sts, 2sctog, sc to end (63)
Rnd 86: sc in next 38 sts, 2sctog, sc to end (62)
Rnd 87: sc in next 40 sts, 2sctog, sc to end (61)
Rnd 88: sc in next 42 sts, 2sctog, sc to end (60)
Rnd 89: sc in next 38 sts, 2sctog, sc to end (59)
Rnd 90: sc in next 40 sts, 2sctog, sc to end (58)
Rnd 91: sc in next 42 sts, 2sctog, sc to end (57)
Rnd 92: sc in next 38 sts, 2sctog, sc to end (56)
Rnd 93: sc in next 40 sts, 2sctog, sc to end (55)
Rnd 94: sc in next 42 sts, 2sctog, sc to end (54)

sc in next 28 sts, ch 15, skip 24 sts, and sc to join in  25th st from the start of the ch (53RD ST OF RND), sc to marker,  you now will be working in this section, top of the head nose  (45sts)
sc around,
 

Rnd 95: sc in next 28 sts 2sctog, sc in next 12 sts,  2sctog, sc to end  (43)

Rnd 96: sc in next 27 sts 2sctog, sc in next 11 sts,  2sctog, sc to end (41)

Rnd 97: sc in next 26 sts 2sctog, sc in next 10 sts, 2sctog, sc to end (39)

Rnd 98: sc in next 25 sts 2sctog, sc in next 9 sts, 2sctog, sc to end (37)

Rnd 99: sc in next 24 sts 2sctog, sc in next 8 sts, 2sctog, sc to end (35)

Rnd 100: sc in next 23 sts 2sctog, sc in next 7 sts, 2sctog, sc to end (33)

Rnd 101: sc in next 22 sts 2sctog, sc in next 6 sts, 2sctog, sc to end (31)

Rnd 102: sc in next 20 sts 2sctog, sc in next 5 sts, 2sctog, sc to end (29)

Rnd 103: sc in next 19 sts 2sctog, sc in next 4 sts, 2sctog, sc to end (27)

Rnd 104: sc in next 18 sts 2sctog, sc in next 3 sts, 2sctog, sc to end (25)

Rnd 105: sc in next 17 sts 2sctog, sc in next 2 sts,2sctog, sc to end (23)

Rnd 106: sc in next 16 sts 2sctog, sc in next st, 2sctog, sc to end (21)

Rnd 107: sc in next 15 sts, 2sctog in next st, sc to end (20)

Rnd 108: sc in next 14sts 2sctog in next st, sc to end (19)

Rnd 109:[sc in next 2 sts, 2sctog] repeat this around until you have 6sts left, fasten off and leave enough length to sew seams together.

Crochet Shark Pattern Free Crochet Shark Pattern, free crochet patterns
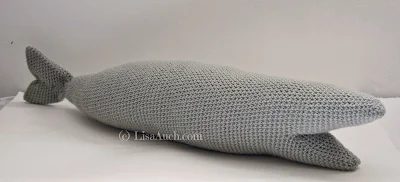
This is what your shark will be looking like at this stage
(you can sew the tail opening, by creating a triangle shape, then weaving the threads in a straight line to the middle back of tail, draw the up into a scrunch to create the sharks back fin at this point if you wish, as I don't like it to fill the tail with the stuffing.)

You can start to stuff the shark with the filling, ensuring it is evenly spread out along your sharks body.

2nd Mouth Section:(Hold the shark RS with the nose pointing up and start at the corner of the sharks mouth) move stitch marker after completion of every round.

Rnd 1: sc around picking up evenly 40sts (40)
Rnd 2: sc in each st around (40)

Rnd 3:2sctog,sc in next 18 sts,2sctog, sc to last, (38)

Rnd 4:2sctog, sc in next 17 sts,2sctog sc to last,(36)

Rnd 5: 2sctog, sc in next 16 sts,2sctog,sc to last, (34)

Rnd 6: 2sctog, sc in next 15 sts,2sctog,sc to last, (32)

Rnd 7: 2sctog, sc in next 14 sts,2sctog ,sc to last,(30) (Stuff the rest of the nose as you go)

Rnd 8: 2sctog, sc in next 13 sts,2sctog,sc to last, (28)

Rnd 9: 2sctog, sc in next 12 sts,2sctog,sc to last, (26)

Rnd 10: 2sctog, sc in next 11 sts,2sctog,sc to last, (24)

Rnd 11: 2sctog, sc in next 10 sts,2sctog ,sc to last,(22)

Rnd 12: 2sctog, sc in next 9 sts,2sctog,sc to last, (20)

Rnd 13: 2sctog, sc in next 8 sts,2sctog,sc to last, (18)

Rnd 14: 2sctog, sc in next 7 sts,2sctog,sc to last, (16)

Rnd 15: 2sctog, sc in next 6 sts,2sctog,sc to last, (14)

Rnd 16: 2sctog, sc in next 5 sts,2sctog,sc to lastt (12) Fasten off and sew across the seams to close.


free crochet pattern large shark crochet pattern free
How your Crochet Shark should be looking now

Sharks Top Fin (Make 1)
Ch 2,
Rnd 1:  4 SC in first chain. (4)
Rnd 2:  2SC in next st, SC, 2 SC in next st, SC to end of Rnd (6)
Rnd 3:  2SC, SC in next 2sts, 2 SC in next st, SC to end of Rnd  (8)
Rnd 4:  2SC, SC in next 3sts, 2 SC in next st, SC to end of Rnd  (10)
Rnd 5:  2SC, SC in next 4sts, 2 SC in next st, SC to end of Rnd (12)
Rnd 6:  2SC, SC in next 5sts, 2 SC in next st, SC to end of Rnd  (14)
Rnd 7:  2SC, SC in next 6sts, 2 SC in next st, SC to end of Rnd  (16)
Rnd 8:  2SC, SC in next 7sts, 2 SC in next st, SC to end of Rnd  (18)
Rnd 9:  2SC, SC in next 8sts, 2 SC in next st, SC to end of Rnd  (20)
Rnd 10: 2SC, SC in next 9sts, 2 SC in next st, SC to end of Rnd  (22)
Rnd 11: 2SC, SC in next 10sts, 2 SC in next st, SC to end of Rnd  (24)
Rnd 12: 2SC, SC in next 11sts, 2 SC in next st, SC to end of Rnd  (26)
Rnd 13: 2SC, SC in next 12sts, 2 SC in next st, SC to end of Rnd  (28)
Rnd 14: 2SC, SC in next 13sts, 2 SC in next st, SC to end of Rnd  (30)
Rnd 15: 2SC, SC in next 14sts, 2 SC in next st, SC to end of Rnd (32)
Rnd 16: 2SC, SC in next 15sts, 2 SC in next st, SC to end of Rnd (34)
Rnd 17: 2SC, SC in next 16sts, 2 SC in next st, SC to end of Rnd (36)
Rnd 18: 2SC, SC in next 17sts, 2 SC in next st, SC to end of Rnd (38)
Rnd 19: 2SC, SC in next 18sts, 2 SC in next st, SC to end of Rnd (40)
Rnd 20: 2SC, SC in next 19sts, 2 SC in next st, SC to end of Rnd (42)
Rnd 21: 2SC, SC in next 20sts, 2 SC in next st, SC to end of Rnd (44)
Rnd 22: 2SC, SC in next 21sts, 2 SC in next st, SC to end of Rnd (46)
Rnd 23: 2SC, SC in next 22sts, 2 SC in next st, SC to end of Rnd (48)
Fasten off , and leave a long tail to use later to sew and secure the piece to the top of the shark.


Sharks Front Fins (Make 2)
Ch 2,
Rnd 1:  4 SC in first chain. (4)
Rnd 2:  2SC in next st, SC, 2 SC in next st, SC to end of Rnd          (6)
Rnd 3:  2SC, SC in next 2sts, 2 SC in next st, SC to end of Rnd      (8)
Rnd 4:  2SC, SC in next 3sts, 2 SC in next st, SC to end of Rnd     (10)
Rnd 5:  2SC, SC in next 4sts, 2 SC in next st, SC to end of Rnd     (12)
Rnd 6:  2SC, SC in next 5sts, 2 SC in next st, SC to end of Rnd     (14)
Rnd 7:  2SC, SC in next 6sts, 2 SC in next st, SC to end of Rnd     (16)
Rnd 8:  2SC, SC in next 7sts, 2 SC in next st, SC to end of Rnd     (18)
Rnd 9:  2SC, SC in next 8sts, 2 SC in next st, SC to end of Rnd     (20)
Rnd 10: 2SC, SC in next 9sts, 2 SC in next st, SC to end of Rnd    (22)
Rnd 11: 2SC, SC in next 10sts, 2 SC in next st, SC to end of Rnd  (24)
Rnd 12: 2SC, SC in next 11sts, 2 SC in next st, SC to end of Rnd  (26)
Rnd 13: 2SC, SC in next 12sts, 2 SC in next st, SC to end of Rnd  (28)
Rnd 14: 2SC, SC in next 13sts, 2 SC in next st, SC to end of Rnd  (30)
Rnd 15: 2SC, SC in next 14sts, 2 SC in next st, SC to end of Rnd  (32)
Rnd 16- Rnd 23 SC in each stitch around, (32)
Fasten off neatly and leave enough to sew fins to the sharks body.

Sharks Mouth:  (With Red)
Ch 6
Row 1:  SC in 2nd Ch from hook, SC to end, ch1, turn. (5)
Row 2:  2SC in 1st stitch, SC to end, ch1, turn. (6)
Row 3:  SC in each stitch to end, ch1, turn. (6)
Row 4:  2SC in 1st stitch, SC to end, ch1, turn. (7)
Row 5:  SC in each stitch to end, ch1, turn. (7)
Row 6:  2SC in 1st stitch, SC to end, ch1, turn.(8)
Row 7:  SC in each stitch to end, ch1, turn. (8)
Row 8:  2SC in 1st stitch, SC to end, ch1, turn. (9)
Row 9:  SC in each stitch to end, ch1, turn.(9)
Row 10:  2SC in 1st stitch, SC to end, ch1, turn. (10)
Row 11:  SC in each stitch to end, ch1, turn. (10 )
Row 12:  2SC in 1st stitch, SC to end, ch1, turn. (11)
Row 13:  SC in each stitch to end, ch1, turn. (11)
Row 14:  2SC in 1st stitch, SC to end, ch1, turn. (12)
Row 15:  SC in FRONT LOOP OF each stitch to end, ch1, turn. (12) (This is the middle of mouth)
Row 16:  2SC in 1st stitch, SC to end, ch1, turn. (14)
Row 17:  SC in each stitch to end, ch1, turn. (14)
Row 18:  2SC in 1st stitch, SC to end, ch1, turn. (15)
Row 19:  SC in each stitch to end, ch1, turn. (15)
Row 20:  2SC in 1st stitch, SC to end, ch1, turn. (16)
Row 21:  SC in each stitch to end, ch1, turn. (16)
Row 22:  2SC in 1st stitch, SC to end, ch1, turn. (17)
Row 23:  SC in each stitch to end, ch1, turn. (17)
Row 24:  2SC in 1st stitch, SC to end, ch1, turn. (17)
Row 25:  SC in each stitch to end, ch1, turn. (17)
Row 26: 2sc tog, SC to last 2 stitches, 2sc tog, ch1, turn (15)
Row 27: 2sc tog, SC to last 2 stitches, 2sc tog, ch1, turn (13)
Row 28: 2sc tog, SC to last 2 stitches, 2sc tog, ch1, turn (11)
Row 29: 2sc tog, SC to last 2 stitches, 2sc tog, ch1, turn (9)
Row 30: 2sc tog, SC to last 2 stitches, 2sc tog, ch1, turn (7)
SC all around the edges of the mouthpiece, make 2sc in each corner to turn,
fasten off and weave in end neatly.


Teeth.
Join white yarn,  to the red mouthpiece just worked.
slip stitch around the whole of the mouth.
working into the white slip stitches just made work [sc in next st, hdc in next, dc in next, ch3, slip to join to the top of the dc,] repeat all the way around.
Fasten off and weave in all ends.

Thank you for visiting my website or purchasing a pattern.
 It helps me to maintain the website and buy new materials to make even more FREE PATTERNS.  
As always you are free to make and sell items you have made from the pattern. But you must acknowledge LisaAuch.com as the original designer. 
YOU will  NOT copy or distribute the pattern online TEXT OR PDF, in part or whole anywhere else,
 or by creating an online video of my pattern. 
Without my express written permission.
You can share a picture of the finished item. With a link BACK to a Page with my website on it 
You must NOT use my pictures in any way to sell a finished product. You must use your own.
You will NOT copy or duplicate this PATTERN (whole or in part) on to ANY other SITE online. Without my express written permission.
This pattern may contain affiliate links.
 Where I may make a small commission from your purchase at no extra cost to you
Happy Hooking (c) All Rights Reserved LisaAuch.com


Popular posts from this blog

FREE Crochet Baby Hat Pattern EASY Step by Step Tutorial

How To Crochet a Baby Hat with this Easy Crochet Baby Hat Pattern  to Fit Newborn, 0- 3 months. FREE.  The newborn baby hat crochet pattern is perfect for beginners and comes in the first 2 two sizes newborn and 0-3 months.

Free Crochet Pattern for a Cute Baby Hat Beanie with Crochet Flower (Cluster Sitch)

Buy This Baby Hat HERE    this was the original picture I was sent and asked to re-create it.  The 'Oh so Cute'Crochet Baby Cluster Hat'  Free Crochet Baby Hat Pattern by Lisa Auch Crochet  Newborn size and 3 months size are shown in the picture This is such a pretty crochet pattern   written to Help those who have maybe just started crocheting but are ready to take the next steps and start creating gorgeous items.

10 minute Easy Crochet Booties Pattern (Booties that Stay on Little FEET)

The 10-minute Easy Crochet Booties Pattern (Booties that Stay on Little FEET) 10-minute crochet baby booties FREE Crochet Pattern I love the simplicity of these booties and know they are going to be a firm favorite, for newborns and preemies (just use a smaller hook)

Unique Crochet Baby Shawl Blanket Pattern Perfect Gift for a newborn

A Unique crochet Baby Blanket, with beautiful crochet stitches that create a wonderful soft shell texture, finished with an easy crochet decorative border.    Crochet Baby Shawl pattern FREE   

Free Crochet Pattern for Baby Hat & Booties (How to Crochet Baby Booties Pattern)

Free baby crochet hat and booties Patterns. This written pattern includes How to Crochet Baby Booties and an easy Baby Hat Pattern. With Step by step photos.  There is nothing more adorable than a newborn baby in a little crochet hat with these little slip-on booties. 

Free Crochet Amigurumi Doll Pattern (A Basic Crochet Doll Pattern FREE)

I love this easy crochet doll pattern. It is an extremely easy pattern and you can be  very creative with the basic doll pattern. Crochet Doll in Red Dress LisaAuch  I have several ideas on how to finish your first crochet doll, including hairstyles and little dresses. 

Crochet Baby Boy Cardigan pattern with hood (Easy Hooded Crochet Cardigan Pattern FREE) 3 sizes

Easy FREE Crochet Cardigan with hood perfect crochet sweater for baby boys.   Boys Hooded Cardigan With Front Buttons and ribbed front fastenings. 

FREE Crochet Pattern Baby Blanket EASY - Little Clouds Crochet Blanket Pattern

FREE Baby Blanket Crochet Pattern (EASY   A free Crochet Pattern for a Baby Blanket, the crochet stitch used resembles little fluffy clouds. 

How to Crochet a 3d Rose (Free Crochet Flower Pattern )

This is a Free Crochet Flower Pattern and it will show you How to Crochet a Rose.   Once made it really is a very beautiful 3d crocheted rose.  This is a fantastic introduction to how to crochet a rose flower, as it is a very easy straightforward written pattern prefect for beginners.  

Free Crochet Patterns for Baby Hat and Baby Bootee Shoes Set. (Newborn, 3 months)

FREE written Pattern for Baby Booties, Mary Jane type Shoe with strap crochet Patterns.   

Popular posts from this blog

How to Crochet a 3d Rose (Free Crochet Flower Pattern )

This is a Free Crochet Flower Pattern and it will show you How to Crochet a Rose.   Once made it really is a very beautiful 3d crocheted rose.  This is a fantastic introduction to how to crochet a rose flower, as it is a very easy straightforward written pattern prefect for beginners.  

How to Crochet a 3d Rose (Crochet a Winners Flower Bouquet)

Free Crochet Red Rose Written Pattern.  Large Crochet Rose Pattern FREE 

How to Crochet a Square Mesh Crop Top with Sleeves

How to crochet the large stacked block square open MESH stitch.

10 minute Easy Crochet Booties Pattern (Booties that Stay on Little FEET)

The 10-minute Easy Crochet Booties Pattern (Booties that Stay on Little FEET) 10-minute crochet baby booties FREE Crochet Pattern I love the simplicity of these booties and know they are going to be a firm favorite, for newborns and preemies (just use a smaller hook)

Crochet Mesh top Pattern. (EASY FREE Written Tutorial)

The Cam Crochet Mesh Top Pattern is a FREE written pattern and tutorial to crochet a Long-sleeved mesh top. It is an EASY Free Crochet top Pattern. Do not be put off by how difficult this crochet mesh top looks to make.  Crocheting has literally exploded!  and has become a  popular hobby in recent years.  One of the many reasons The open mesh crochet stitch has become so popular is the ability to create unique and stylish garments, such as crochet mesh tops with or without sleeves, full-length or crop tops. 

Newborn Baby Crochet Hat Pattern Perfect Crochet Hat for Donating to Hospitals

This newborn crochet hat is perfect for babies just coming out of the hospital or to donate to a Charity.

Crochet Flower Pattern FREE to make Lily Of The Valley(Crochet Flower Bouqet)

How to Crochet Lily of the Valley Flowers, written crochet pattern, and helpful photo tutorials to help you crochet and create a beautiful crocheted replica of this delicate flower.  These would look gorgeous in a crochet flower bouquet for any occasion. 

FREE Crochet Tulip Flower Pattern & Crochet a Flower Bouquet

EASY Crochet Tulip Pattern FREE. This is a written Crochet Tulip Pattern with photos to show you how to crochet a tulip flower and create a stunning Crocheted Tulip flower Bouquet. 

Bucket Hat Crochet Pattern Multi coloured (Free )

Crochet Adult Brimmed Bucket Hat, Free Crochet Pattern to make the HAT using up your Scrap Yarn in your stash! Scrap Yarn Stash Busting Crochet Hat Pattern  Make a wonderful multi-colored brim hat perfect for sunny days or Rockin it as a festival bucket hat. Festival Ready Multi-colored bucket hat Crochet Pattern FREE. I just LOVE creating bucket hats after their increasing popularity this year I released a few Bucket hat patterns.

How to Crochet a Daisy Granny Square Bag

Granny Square Flower Crochet Bag Pattern FREE.  Written and Photo Tutorial to help you crochet a granny flower square bag. 
Thank you for visiting my website or purchasing a pattern. It helps me to maintain the website and buy new materials to make even more FREE PATTERNS. As always you are free to make and sell items you have made from the pattern. You MUST acknowledge LisaAuch.com as the original designer. YOU will NOT copy or distribute the pattern online TEXT OR PDF, in part or whole anywhere else,or by creating an online video of my pattern. Without my express written permission. You can share a picture of the finished item. With a link BACK to a Page with my website on it You must NOT use my pictures in any way to sell a finished product. You must use your own. You will NOT copy or duplicate this PATTERN (whole or in part) onto ANY other SITE online. Without my express written permission. You will not crop or heavily EDIT the images belonging to LisaAuch Crochet/ Lisaauch.com, nor add any further TEXT or Imaging to them.This pattern may contain affiliate links. Where I may make a small commission from your purchase at no extra cost to you Happy Hooking (c) All Rights Reserved LisaAuch.com