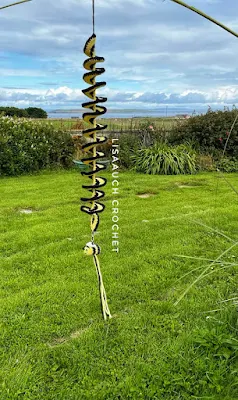
I am completely obsessed with making these crochet wind spinners, and every time I get a new idea for one, I just got to crochet it. I am moving through my stash yarn like lightning making these wind spinners, as they are such an easy project. SO here's the next wind spinner for you
Poppy Spiral Windspinner FREE CROCHET PATTERN by LisaAuch Crochet
 |
| BUY NOW Thankyou for your continued support |
THE BASIC WIND SPINNER WRITTEN PATTERN
Notes: By working the rows you are creating a Spiral, as you progress it may work out of shape so once you are finished roll the wind spinner up as per the picture.
For the crochet Windspinner Pattern Written in US terms
Chain 66 (65 +1) ( or any length you desire)
I do find if I make the chain too long it does not spin as well in the Wind.
In Black ROW 1: single crochet in each stitch along the chain. Fasten off leaving a long tail
(Starting at the same place as ROW 1 started)
In RED ROW 2: 2dc in each stitch. Fasten off leaving a long tail
(Starting at the same side as ROW 2 started)
In Red ROW 3: 3dc in each stitch. Fasten off. Leaving a long tail
(Starting at the same side as ROW 2 started)
In BLACK Row 4: Sc in EACH stitch along the spiral. Fasten off. Leaving a long tail.
Knot all the tails at the bottom and leave loose to hang in the wind.
I used a length of BLACK yarn to create a loop at the top of the spinner, to be able to attach it to a branch or hook.
I was asked if I would write an EASY to crochet Poppy Flower Pattern.
I have contributed to many Huge Scale Poppy Displays. Recently being involved in a local crafters project, so we needed a VERY QUICK, EASY Crochet Poppy Pattern.
The more we could crochet the better the display would look.
Obviously, they are housed outside whilst on display so needed to be pretty robustly made.
 |
| Poppy Display Image credit: @StranraerCrafters on facebook |
Free Crochet Poppy Pattern (EASY) Prefect for making in Bulk especilly for displays outside
Chain Ch3. Work 8 Double crochet into the first chain.
Slip to the TOP of the Ch3 to join.
(8 DC)
Change to RED. Chain 4, and work 3 treble crochets (trc) in the base of the chain 4 st,
Continue working around, and Work 4 Trcs in each stitch around, slip to join (32sts)
*Chain 3, dc in base of chain 3, *dc in next 7 sts, ch2, slip st into the next st.ch2,* Repeat ** around until last slip st, make this SC into the same space as the beginning chain. Slip to join into starting ch to finish.
Fasten off leaving a long tail to join the poppy to the Spinner.
weave in all other loose ends. I find using one single strand of yarn to hang it from works the best.
Ready to crochet some more windspinners. how about a Bee themed on or a Pumpkin Windspinner perfect for Halloween Decore
 |
Basic Crochet Windspinner Pattern |
 |
Spiral Windspinner Pattern (pumpkin) |
Thank you for visiting my website or purchasing a pattern.
It helps me to maintain the website and buy new materials to make even more FREE PATTERNS.
As always you are free to make and sell items you have made from the pattern. But you must acknowledge LisaAuch.com as the original designer.
YOU will NOT copy or distribute the pattern online TEXT OR PDF, in part or whole anywhere else,
or by creating an online video of my pattern.
Without my express written permission.
You can share a picture of the finished item. With a link BACK to a Page with my website on it
You must NOT use my pictures in any way to sell a finished product. You must use your own.
You will NOT copy or duplicate this PATTERN (whole or in part) on to ANY other SITE online. Without my express written permission.
This pattern may contain affiliate links.
Where I may make a small commission from your purchase at no extra cost to you
Happy Hooking (c) All Rights Reserved LisaAuch.com


