 |
| Make Easy Halloween Crochet Decoration ideas |
You can BUY an AD FREE printable PDF Straight from Ravelry With PAYPAL secure Checkout HERE Includes Windspinner and Small Pumpkin Pattern 
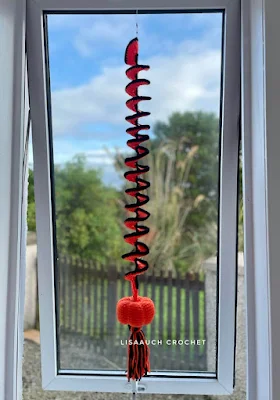
Easy Crochet Pumpkin Windspinner Window Decoration
I love these crochet wind spinners I am crocheting lots of the spinners just now for some home decoration in my sunroom, and now My grandson is obsessed with these wind spinners.
So I have been busy crocheting several themed wind spinners for him, since the Autumn/ Fall season celebrations are nearly upon us I thought how about a lovely Pumpkin themed wind spinner. These would make amazing crochet home decor ideas for Thanksgiving and Halloween
When crocheting the Pumpkin I use the Method of YARN UNDER for the Single crochet, it gives a much nicer finish and is not so ‘gappy’)
Yarn under Single crochet sometimes you will see it written as YuSc
CROCHET PUMPKIN WIND SPINNER
You can Make the yarn spinners as long as you want. Just make the Chain as long as you would like.
Make a chain any number you wish I made 81 chains to start this wind spinner
You can USe ANY yarn and ANY suitable hook for your yarn.
Materials:
1. I used less than 1 x 1 25g of Black and 25 g of Orange
2. 3.500 mm hook.
3. Some stuffing
4. Googly eyes and a little black yarn for the mouth (IF you wish)
Pattern Written in US terms
Please note before starting to crochet the wind spinner
as the spiral grows and curls You may find it begins to twist out of shape simply twist the spiral all in the same direction
You will work in ROWS until the last stitch where you will finish. Breaking yarn and weave in ends.
Fasten off the last stitch by working as normal but by pulling your yarn through the last stitch completely.
START EVERY ROW at the SAME SIDE.
Working EVERY ROW in the SAME direction
Wind spinner crochet pattern
Chain 80 (80+1) ( or any length you desire)
ROW 1: single crochet in each stitch along. Fasten off leaving a long tail
(Starting at the same place as ROW 1 started)
ROW 2: 2dc in each stitch. Fasten off leaving a long tail
(Starting at the same side as ROW 2 started)
ROW 3: 3dc in each stitch. Fasten off. Leaving a long tail
(Starting at the same side as ROW 2 started)
Row 4: Sc in EACH stitch along the spiral. Fasten off. Leaving a long tail.
Weave in ALL ends
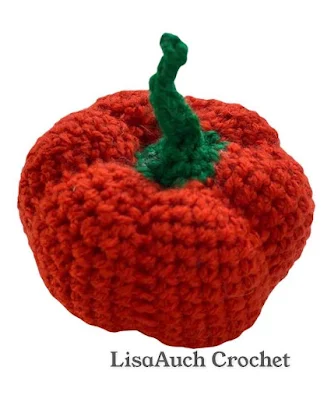
Small Crochet Pumpkin Pattern
 |
| Pumpkin in the Picture made WITH STEM (follow Directions to make without stem) |
Using a 3.50mm hook
Orange Yarn
A small amount of stuffing
Ch2,
Rnd1: work 6 sc into the 2nd ch from hook(6)
Rnd 2: 2sc in each st around (12)
Rnd 3: *Back loop sc in nxt st, 2sc in nxt * Repeat * *around (18)
Rnd 4: *Blsc in nxt st,sc in nxt sc, 2sc in nxt * Repeat * * around (24)
Rnd 5 *Blsc in nxt st, sc in nxt 2 sts, 2sc in nxt * Repeat * * around(30)
Rnd6:* Blsc in nxt st , sc in nxt 3 sts,2sc in nxt * Repeat * * around (36)
Rnd 7: *Blsc in nxt st, sc in nxt 4 sts,2sc in nxt * Repeat * * around(42)
Rnd 8: to Rnd 15: BLsc in nxt st, sc in nxt 6sts* Repeat around (42)
(7 rounds in total )
Rnd 16: *blsc, sc in nxt 4 sts, work 2sctog in nxt * Repeat * * around (36)
Rnd 17: *blsc, sc in nxt 3 sts, work 2sctog in nxt * Repeat * * around (30)
Rnd 18: *blsc, sc in nxt 2 sts, work 2sctog in nxt * Repeat * * around (24)
Start Stuffing here
Rnd 19: *blsc,sc in nxt sc sts, work 2sctog in nxt * Repeat * * around (18)
If you want to crochet a Stem Change to Green at Rnd 20 HERE
Rnd 20: *sc in nxth, work 2sctog nxt * Repeat * * around (12)
Add in some more stuffing here making sure it's quite full
Rnd 21: green *2sctog * Repeat * * around (6)
LEAVE A LONG TAIL OF ORANGE HERE to USE LATER
FOR NO STEM FINISH HERE
STEM
Work sc in nxt st 8 ch, (STEM) working into the 2nd ch from the hook, continue to crochet 1 sc in each ch, back down the chain just created) you will make 7 sc in total.
(STEM CREATED) work 2sctogether around, and slip to the 7th sc of the stem (bottom of stem to Join)
Fasten off leaving a LONG tail
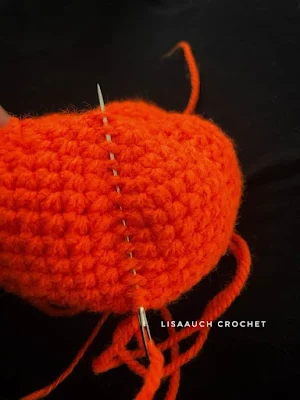
Use the ORANGE Long tail to weave in the FRONT loops of the rest of the stitches.
NOTE: your Pumpkin is Now divided into 6 sections
(where you created the BACKLOOP single crochets)
Take the yarn on your needle thread through these front loops and gently draw top to bottom together. (this will make your first segment of the pumpkin)
Repeat around.
I attached the pumpkin to the Bottom of the wind spinner.
Leaving a Longtail to tie the tassel on with
Make a simple tassel
Wrap yarn several times around a small book. CUT AT ONE SIDE
Tie together slightly down from the Top Loop. And use the yarn from the bottom of the pumpkin to attach the tassel
You can Decorate and finish by adding eyes and a mouth if you wish.
You can make more Themed Crochet Windspinners
Visit my Website HERE
FREE Crochet pattern - Pumpkin Crochet Booties
My Favourite EASY Plushy Pumpkin Patterns (3 Sizes) FREE
 |
| FREE crochet Pumpkin Pattern 3 SIZES |
A fantastic Halloween Croche decoration and These sell So WELL at craft fairs in the autum. is the Easy Pumpkin Widspinner
 |
| FREE Crochet Windspinner Pumpkin Pattern |
Pumpkin HAT Crochet Pattern FREE
Pumpkin Booties Crochet Patterns FREE
You MUST acknowledge LisaAuch.com as the original designer.
YOU will NOT copy or distribute the pattern online TEXT OR PDF, in part or whole anywhere else,
or by creating an online video of my pattern.
Without my express written permission.
You can share a picture of the finished item.
With a link BACK to a Page with my website on it
You must NOT use my pictures in any way to sell a finished product. You must use your own.
You will NOT copy or duplicate this PATTERN
(whole or in part) onto ANY other SITE online.
Without my express written permission.
You will not crop or heavily EDIT the images belonging to LisaAuch Crochet/ Lisaauch.com,
nor add any further TEXT or Imaging to them.
This pattern may contain affiliate links.
Where I may make a small commission from your purchase at no extra cost to you
Happy Hooking (c) All Rights Reserved LisaAuch.com


